top of page
Launching Audio Visual
In this project we are encouraged to consider what sound can physically look like and vice versa what do visual components like colour, shape and form sound like? This project is an exploration into sound visualisation and generation.
Research


Immediately after the briefing and workshop 1 I had a little brainstorm and the physical embodiment of sound seemed to be a really important theme. I've used tools like the playtronica before but instead of using midi and the likes I wanted the sound itself to be more of trigger. I started doing some artist research into audio visual works.
Christian Marclay
Marclay is a Swiss -American visual artist and composer, his work explores connections between sound, noise, photography, video, and film. He is a pioneer in using gramophone records and turntables as musical instruments. These are two of his videos above and were my favourites for different reasons. The first video was really interesting I liked the composition of each clip and how everything happened simultaneously both visually and audibly. He used and combined audio from various filmed scenes to create musical compositions through one singular edited video. It made me think of ways to re-use recorded sound and how 'found' audio can be of value. The second video I just really appreciated the completely weird sound experiment. He drags an electric guitar behind a truck while it's plugged into an amp and sees how the road effects the sound.

Marclay not only engaged in screen based media, he used the tangible products of sound production to create artwork. In this series he used album covers to create collage work. I liked this abstract collage above, cover art wasn't something I had really considered in this project but this was an interesting avenue to explore for gaining insight into visuals.

Christine Sun Kim
Christine Sun Kim is an American sound artist based in Berlin. She works with mark making practices, performance, and video while exploring the role of sound in society. Kim explores the operations and functions of sound and how various aspects of Deaf culture intertwines through sound. Kim is deaf since birth so this is a really key and unique aspect of her work. She created a signature visual language which was inspired by a variety of audio information systems like written language, musical notation, and American Sign Language (ASL). In the video above it shows viewers interacting with her installation 'Game of Skill 2.0'. Viewers were invited to touch a staff-like device attached to a velcro strip hung above their heads and as they walked, dragging the device along the strip, a radio played sound at levels and speeds depending on the direction and speed of the participant. I liked the physical aspect of this piece and how the user was physically in control of the outcome. Christine's practice and research into Deaf culture reminded me of how important it is to factor in disability inclusivity into my designs especially for a project oriented around audio. How could I make something based around audio fun and successful for say someone who was partially deaf?
Samson Young
Samson Young is an artist from Hong Kong who in 2017 represented Hong Kong at the Venice Biennale. He speciliases in sound installations and one of my favourite installs of his was this one in the video above. This installation was his first show in New York in 2015, he watched six hours of compiled footage of US bombs dropping in the Middle East on mute, and then recreated the sounds of the carnage on a custom-made setup of instruments and non-instruments, like a can of compressed air, or a shaving razor. I like multiple aspects of this work especially the subject matter, I think it's a really profound way to use such devastating footage and to use it at these huge events with such global coverage is a statement. I like the fact the physical setup is such a spectacle and that not everything he uses is purely musical. It highlights to me what links our brain can make or what factors it can ignore to create a connection between visual and sound, for instance the shaving razor being used to emulate the sound of planes.
Carsten Nicolai
Carsten Nicolai is based in Berlin and has been working in the sound industry since the late 80's. I knew him through his work at the record label Raster Noton which was a great label for techno music in the 90's and are in fact still selling vinyls (the latest release was this year). This piece however was new to me and I really liked how the frequencies could trigger such slight visual alterations that were still so engaging. I could watch something like this for hours. The installation was called 'reflektor distortion' in short it is a rotating, water-filled basin that is connected to sound frequencies to alter the lights form in the water reflection. It was inspired by the shape of a parabolic mirror that rotates water via centrifugal force. The work consists of the three main components mirror, reflection and distortion.
Weish
Singaporean artist and singer Weish did this performance using the Playtronica midi device for Vogue Singapore in 2021. Her music she describes as 'a landscape' so these abstract ethereal sound loops are prominent throughout her compositions. The Playtronica was a great gadget for integrating objects into live performance. In this case Weish's song relates back to life forms and creation so it's quite fitting she be surrounded by natural forms like flowers and fruit. It's quite a contrast to the usual electronic music and by using these natural and organic elements it creates this great clash between what I would expect of electronic sound but thats the part I like most in this performance. The wires are concealed and it creates this great illusion that the digital is actually organically created.
Pierre Bastien
Pierre Bastien was born in 1953 in Paris, his career was comprised of making weird and wonderful contraptions that he could use to compose music. Bastien began building mechanical-based musical instruments using objects like metronomes, cymbals, and pulleys. In 1977 he started a partnership with Pascal Comelade and the two composed music for dance companies. He performed in ensembles such as Operation Rhino and Nu Creative Methods. In this video, he created motorised machines that used everyday object such as scissors to create noise through movement. I not only loved his machines but this type of video documentation, I found it very compelling and effective for understanding how the machine functioned. This made me consider what kind of everyday objects I could use to make music and how could arduino maybe play a role in this?
Key points from my research:
1. How does the user interact with sound, does the sound occur when they physically create it or does the user manipulate a sound? Where does accessibility fit into the design?
2. What hardware is needed to create an interactive experience and does the hardware effect the sound like in Thessia Machado's works ?
3. How can factors of the sound itself like frequency or amplitude effect realtime visuals like in Nicolai's work?
These were all very interesting and thought provoking pieces that explored audio in ways that I hadn't imagined before but I kept exploring and researching the more historic forms of audio recording. I mean what was the first thing that was ever recorded and how did it sound?
I went on to research more about audio recording and how it originally came about. This video below was useful for understanding the hardware history of the music industry throughout the decades.
The Phonograph
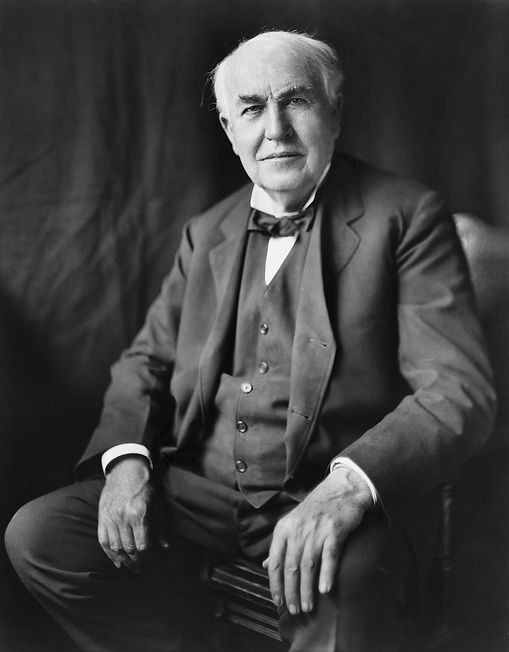
Thomas Edison
This was the first ever recording on the Phonograph machine where Edison spoke into the cone and read the rhyme
'Mary had a little lamb'.
Edison was born February 11, 1847 and died October 18, 1931. He was an American inventor and businessman that developed many devices in various fields including electric power generation, sound recording, and motion pictures. These inventions, which include the phonograph, motion picture camera, and early versions of the electric light bulb, have had a profound impact on modern society.
Edison developed hearing problems at the age of 12, this was attributed to a case of scarlet fever he developed during childhood. As he was completely deaf in one ear and barely hearing in the other, it is alleged that Edison would listen to a music player or piano by clamping his teeth into the wood to absorb the sound waves into his skull. I thought it was fascinating that the inventor of audio recording was actually hard of hearing. Doing more research into Edison I came across a few of his wacky inventions and how he generated power for his creations. While researching him I had an idea to pay homage to the inventor by creating my own wacky machine. I wanted to link two of his most well known inventions, the Lightbulb and the Phonograph.
What would happen if they powered eachother or if the bulb could play recordings back or if there was a series of led strips each playing an instruments wave form in a symphony or if they were reactive to eachother or if they were built into eachother and the cone of the phonograph could light? The possibilities of connecting light to sound seemed endless so I thought this was a good place to start.
Readings

'Technology, Design and the Arts - Opportunities and Challenges'
written by Rae Ernshaw
"In many cases, one individual may take on multiple communication roles in their work" I liked the part in this reading where it discussed 'Combined Perspective'. It resonated with me about my own practice and how I blend new digital technologies with physical computing and traditional craft. How can sound design come into this and what kind of art practice would sound work well with?

'Mind the Screen media concepts according to Thomas Elsaesser'
written by Patricia Pisters and Wanda Strauven
I liked exploring how screen based media and audio have this kind of inseparable relationship. Each can inform each other and both are pivotal in the others success of translating narratives. What if the visual and the sound were somehow disconnected or what if the visual isn't what you would expect of the sound?
Sketching


These were my first sketches. I like the hardware that goes along with the listening to music like record players, walkmans, radios and in this sketch the gramophone. My first idea was to have two gramophones that speak to eachother and have passers by interact with the conversation through pressing effect buttons on the gramophone box. This sketch evolved after looking more into Edison's inventions and looking at prior versions of the gramophone.
The gramophone had actually derived from Edison's Phonograph but used vinyl instead of wax. The Phonograph was the first audio recording machine and used a needle to engrave audio wave forms on a cylindrical wax mould by the force of the vibrations of a person speaking or singing into the metal bell above the needle. Once the needle was removed and the playback needle inserted the wax cylinder could be dusted off and played back amplified by the metal bell.
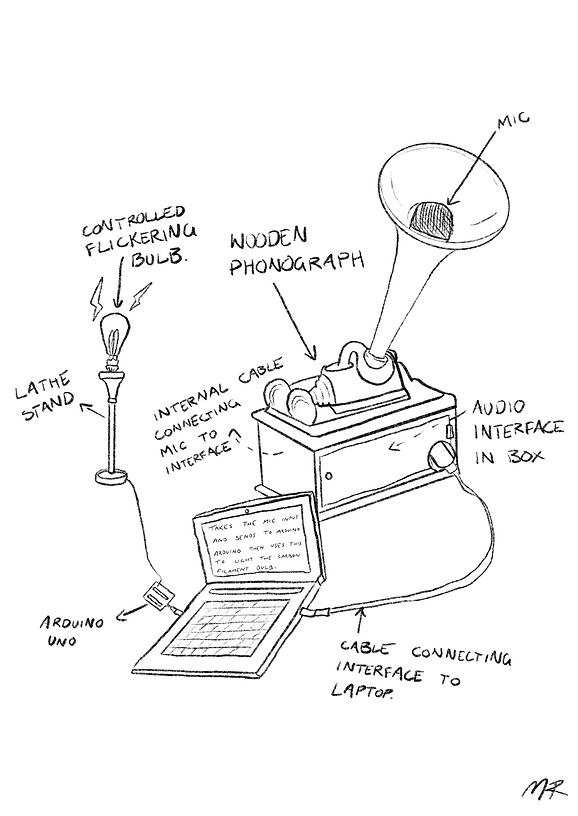
I was so impressed by the Phonograph considering it was the first of its kind. After my prior lightbulb moment (excuse the pun) of connecting two of Edison's most well known inventions I started to sketch how I could make it work. I thought of connecting an mp3 audio recording to trigger a light, specifically a lightbulb with carbon filter (invented by Edison).
This sketch above was initially how I thought it would work but I knew the hardware was clunky and I just needed to have a think about how to get the same outcome with less parts. This is where the tutorial below came in handy. Instead of using the whole mic and interface setup I would bypass that by connecting a sound sensor directly to the Arduino. This is less cumbersome and far more streamlined way of doing things.
I follow this person on Youtube Jay Baviskar and he makes great tutorials for Arduino. This was a really helpful one and I used this to form the basis of how this machine would work.


1/1
Going forward with the phonograph idea I had to start physically imagining it to understand how I could construct. These were various sketches of me going back and forth on hardware and dimensions.
Ultimately after watching various tutorials and looking at parts, I decided to use a sound sensor, connected to an arduino uno that would then be connected to the dmx controller and lightbulb. I ordered my parts from Pimoroni and got some LED's to have a practice run at the code before connecting the DMX.


they came!!!

This is my wee bottle opener key chain that I made in the metal induction for this project :)
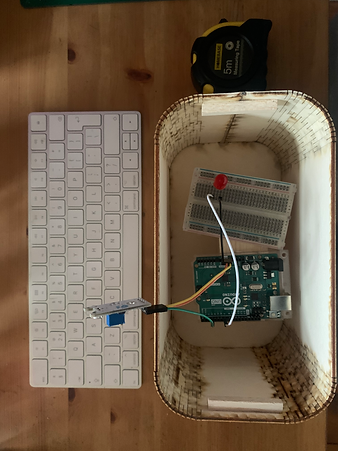
This was my first setup with the sound sensor and the arduino. It was a very basic amplitude reacting led light. It was a digital pin setup that would light when the sensor read went from 0 to 1. This was the basic premise of what I wanted to achieve with the final lightbulb so I was pretty pleased here when everything worked according to plan.
Process

Physical Prototyping
The physical form of a project is something I value and love to bring from conceptual sketch to real life object. I love being in the workshops and this project is no different. I knew the Arduino logic behind the project was something I should be able to do and I was also aware of strike actions during the month of February meaning my access to workshops would be limited. I acted quickly in getting physical ideas started to counter act any closures so if my process for this project seems a bit backwards that's my reasoning for it.
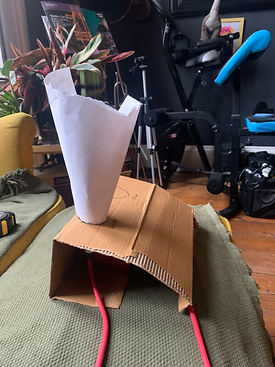
This process was very trial and error. I had a few techniques I wanted to try out that I've never attempted before such as working with metal and lattice joints for my woodwork. To save money and have an idea for dimensions I always make a cardboard prototype out of spare cardboard from the house. These prototypes pictured were still using the mic and audio interface setup but I still could get a good grip on how big I needed things to be despite using the wrong hardware.


@woodshop
In the woodshop I chatted to the techs and I decided on a few key constructions points for the box.
1. To do the Lattice joint on the wood to give the box a proper phonograph look it was better for me to lasercut, otherwise I was going to have to spend a lot of time doing individual cuts by hand.
2. To be able to get easy access to the arduino parts I should make the lid able to come off, I had originally thought hinges but a simple box lid with a lip was what I ended up with.
3. The cone could have been done in acrylic as this would have been more lightweight for the box but the vacuum seal machine is broken so my original idea of metal will have to do. This however meant that I had to do an induction and try and get booked in. The cost of metal is also pricer but I think will aesthetically look better.


This was my first run at the laser cut box but there were a couple factors I wasn't too happy about/hadn't considered so I had to ultimately go back to the drawing board. These were things like the lid was about 10mm to small and I hadn't made any cut outs for power cables.

My physical working is reminding me of artist Thessia Machado who creates kinetic, sculptural, music-making machines for performances. I like the trigger based logic she uses as well as the abstract ideas of what sound can effect. In this piece she uses cassette tape to create and trigger various sounds, I wonder what motor based work I could start working on.

To do the cone in metal I would have to cut my template from sheet metal. To do this you have to print off a template place it on the metal sheet and use a scribe to redraw your template onto the sheet metal. After you've drawn on the template you can cut this metal by hand on the large bandsaw and grind the corners to get rid of the sharpness. The template part is simply a pdf or svg file that you can make in Illustrator. To do my cone template I use a site called BlockLayer which has a variety of template generators. You put in your dimensions in inches and then save the file as a svg ready for print. These weren't the final dimensions I used and there were a lot of paper cones made before moving onto Aluminium.
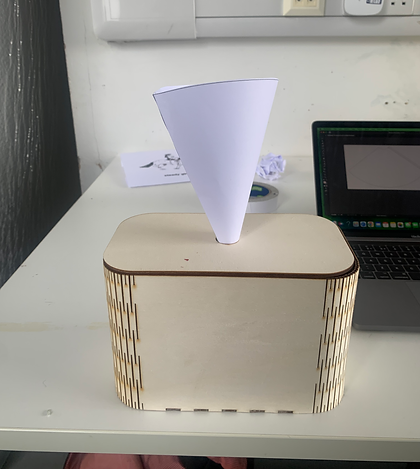
This picture was probably my 10th cone of the day and I was finally happy with the sizing. The final dimensions were 8 inches tall with a 0.75 inch diameter for fitting into the box lid. I initially wanted a much larger cone like pictured in the phonograph to the right,
but after making the box using 3mm ply I knew I didn't want to make anything too top heavy. The options in metal workshops are steel or aluminium so I opted for aluminium the lighter of the two but slightly more expensive right now. In my head the fitting for the cone should be fairly simple, just like an ice cream cone fitting into a holder.


I had always liked the idea of a pair and despite initially wanting to lathe a stand for the lightbulb I rather decided to have two identical boxes side by side. One to have the sound sensing cone and the other to have an Edison lightbulb on top. Slight problem was because I had made the cone opening so small there was no way for a bulb to fit in the same opening so I needed a new lid. I decided on a 4cm diameter to let me get all my fitting comfortably in place and the bulb secure.

The lightbulb lid
The cone lid
The prototype lid
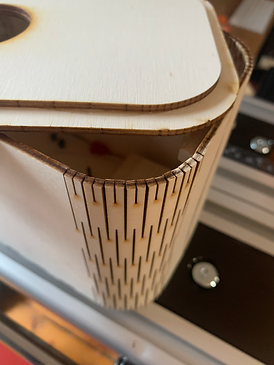

The new lids were 10mm larger all round which meant they could now actually fit into the box and close then the top left a nice lip making it look a bit more finished unlike the first lid that relied on internal supports.

These were the kinds of bulbs I was after. Very Edison aesthetic and also not LED's which was important so they could be dimmable.
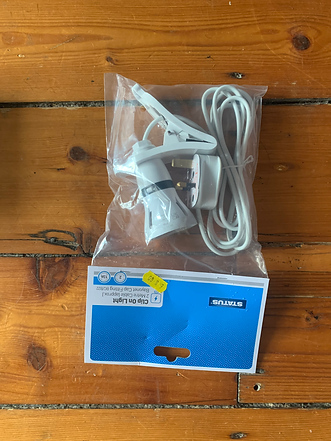
I also bought my own light fitting that had a clamp so I could easily position the lightbulb within the box by clamping it to supports.
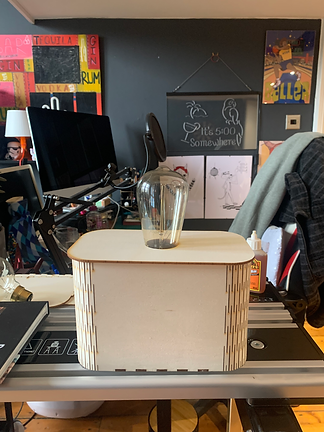
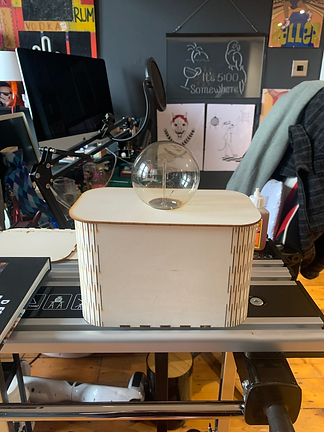
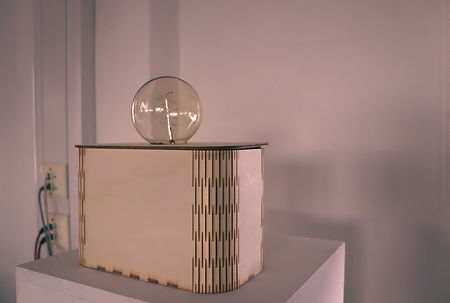
These were the bulbs in the box, i'm leaning more towards the round bulb just for stability and I like the look.
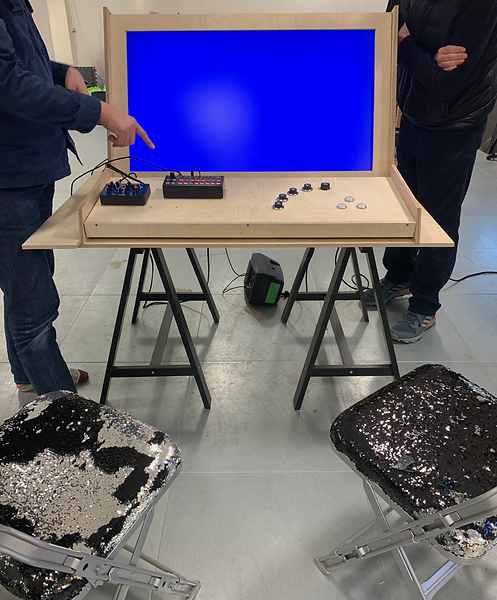
Visit
After the visit to SoundPlay I was even more interested in physical experimentation. I liked this machine the most and it reminded me of the arcade machine I built for control. The visual shapes were interesting and I could play about with the synthesisers to manipulate the on screen visuals. Lasercutting and natural materials were prominent features in their work and they had been working on lattice joints too. It was a valuable visit and I got to understand how designs like this can be implemented in the real world and who would use them. The guys work with kids, in particular kids with learning difficulties, this was really cool and powerful to see how much the kids enjoyed interacting with the works. This fact definitely helped me to consider ways to improve accessibility and durability in my designs.
Coding Work
I had a play about with some code after the initial workshops. It was really having fun with the examples and I especially liked the triggering of sounds and using sounds to trigger graphics. If I hadn't of gone down the DMX route I would've maybe tried something with that Novation synthesiser. This video was just triggering an mp3 to play when there was a peak in amplitude. Needed to sort the cutoff and add some delay.
Experiment 1
fading noise circles dependant on amp in
Experiment 2
beat detecting circle connected to size and direction
Experiment 3
beat detecting circle connected to size and direction with randomised colour
Experiment 4
amplitude detecting line dance
Starting on the light code

This was my first setup with the dmx. I only had the led bulb in the studio so I was missing the dimmable aspect of a carbon filter bulb. In my tutorial myself and Paul had a conversation about instead of the light just turning on and off in response to audio what if the light mimicked the audio wave form of the clip. We worked together looking at the map() function and how to make the amplitude the flickering.
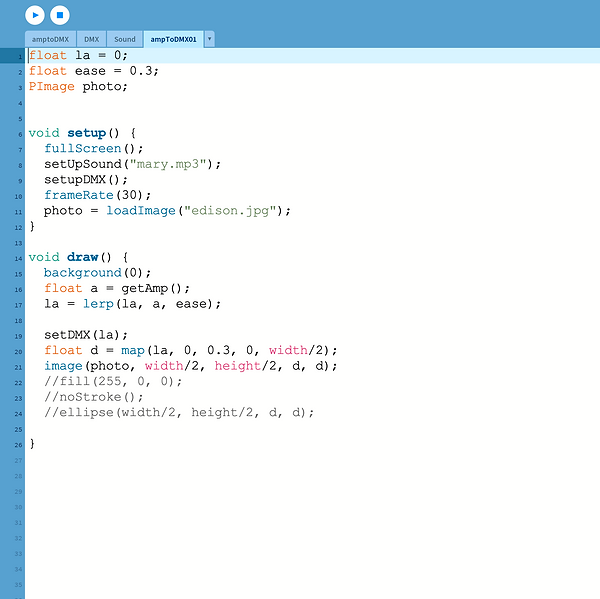
I noticed that the light despite being an led and not ideal was still very jumpy in the previous video example. To combat this we were shown how to add the lerp function which meant that instead of jumping from between 0 and 1 it would use a lerp value of in this case 0.3 to ease between values and make the jump between values less significant. Physically this made the light less jumpy and more of a consistent flicker.

This was the setup for the dmx and doesn't really change. Paul showed me this directly from an example in the dmx library in Processing. Remember you need to install and import the library.

I knew I wanted to take my laptop out of the equation and I wasn't sold on using an audio mp3 file. The original Phonograph worked purely off of someone speaking into the cone so to have a live input be my trigger was more what I was looking for. I was glad to have done those initial experiments with the mp3 in Processing since I feel it set me up to understand the logic of the sensor input. I decided I wanted to have this run off an arduino so everything could fit into the two boxes. The dmx box however after working with it I realised it was far too big and clunky to fit into any design so it would just have to go under the table. This was my first setup with the dmx module. This little component meant I could plug the arduino directly into the dmx without having to use my laptop.
Points to Note
The code was in theory good to go however I need to iron out things like...
1. The noise level threshold. The light is reacting to a lot of noise and I need to work on the threshold level to fine tune what it reacts to and what it doesn't react to.
2. I need to make sure the sensor is working properly. The first sensor wasn't sensitive enough and now this sensor is overly sensitive, I can adjust this with the little built in potentiometer and a screwdriver.
3. How do I want the light to respond to noise? Do I want it on and off, live reacting to amplitude, constantly on but flickering to peaks? This is something I need to play about with in code and see what looks best in person.

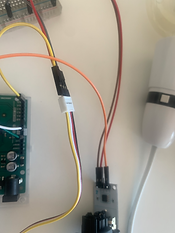
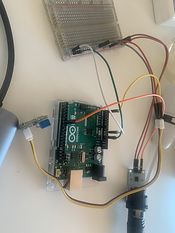
This was my final arduino setup!
I came in early one morning to the studio when I knew it would be quiet to set the threshold level. I wanted it to be 'silent' so I could see what serial read value I wanted to set the threshold at. The lower I set the number the more reactive the light. Here I set it at 167 but it seemed to still be too sensitive and the delay was too great.
I had noticed an error with the threshold, once the reading had met the threshold once and the light turned on it remained on and wouldn't turn off despite going below the threshold. To fix this I added another conditional statement saying if the sensor read was below the threshold turn the light off. I noticed from playing about in some of the values in this statement I could make the light smoothly turn on and off purely voice activated, this was fun to mess about with.
I ended up opting for a 170 threshold at this time and kept the value at 1 so the light would remain on as long as the value was above 170 and turn off if under. This was the best example in the setup and I found this one to work quickly and accurately in terms of response levels.
Final Code

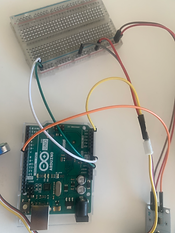
Close up setup
use this if you need to re setup in future


Ultrasonic Sensor
At this point we were in week 3 of the project and I was happy with the point my work was at. I had accomplished what I had set out to do with the lightbulb/amplitude experiment and all I was waiting to do was get into the metal workshop to get my hands on the equipment to construct the cone to look a bit more polished.
I had come up with a bit of a joke idea of a talking box that was triggered by sensors or a kinect. Since I had a few days left I thought I'd give this a go and see what I could start working on.
Research

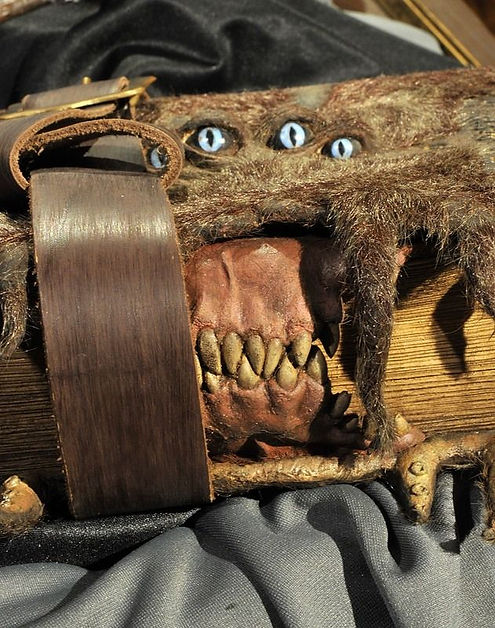
Harry Potter
The Book of Monsters from the Harry Potter books excited me when I first started to think about using ultrasonic sensors. The book is pretty weird and wonderful to look at and has that whole touch me not fantasy. People are drawn to it despite its creepiness. In the Harry Potter books when the students brought the book to Hogwarts for Rubeus Hagrid's Care of Magical Creatures class, they had to force the books shut with belts and Spello-tape because they didn't know how to calm the books. The book holds important literature about various species of magical creatures but it also tries to attack you with its vicious set of teeth. I like the whole danger and alarming aesthetic of the book and I like the idea that a sensor could trigger something like this through motors or audio or both!
Shohei Fujimoto
Shohei Fujimoto is a Tokyo-based new media artist that explores his designs from a primitive perspective by highlighting nature and natural objects as a main feature in interactive artworks.
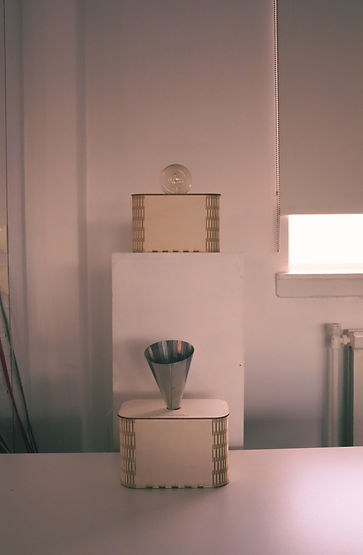
This piece was described in the magazine Neural as "“sissi” by Shohei Fujimoto is formally a Japanese traditional “Shishi-odoshi” device. These devices are originally made to frighten away animals posing a threat to agriculture. They are based on the mechanism of the “sōzu”, which is a water fountain made of a bamboo tube, pivoted to one side of its balance point. The flowing water inside the tube inverts its balance, causing it to rotate and pour out the water, but also making its heavier part fall against a rock, making a sound that usually alarms herbivores and protects the fountain."


Alan Rath
Human characteristics, artificial intelligence, automation, robot, personality.
and
Physical computing, voice, sound manipulation, concealed hardware, motorised, screen based, video.
Tony Oursler


Sketching


Process

Final
Below are some images of the final outcome. I was super pleased with this project and how it ended up looking. I think the identical boxes are a great pair and it definetly resembles a modern style Phonograph. To expand this project I would maybe look at frequency detection next so the light gets brighter dependant on the pitch of the sound. I would also maybe like to expand it from one singular lightbulb to a series of bulbs and play about with the presentation. I feel like this code is a great example base for future light based works.


bottom of page